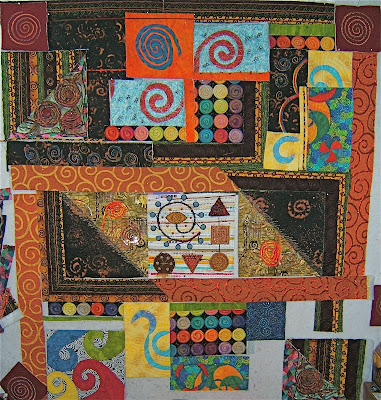
Seams and details within this quilt have kept me busy. To more easily handle this quilt I had decided to seam the elements/blocks together that I know/believe work.
I use scotch tape to secure the butted edges of two blocks in position. These are placed about 6" apart on the back side.
A wide zig-zag (7.0 on Pfaff 7530) stitches them together. I use a mono filament thread for the top so the seam won't be visually obvious. A regular thread is on the bobbin.
Gently pull one side of the tape backwards across the seam to allow the stitches to tear through the tape to more easily remove it. Do the same with the other end.
I like to strengthen this seam between blocks. My additions not only do that, they also camouflage it or soften and blend hard edges between the blocks. This is done more easily while the pieces are small and manageable. Note the free-motion back and forth line that had been added to the diagonal seam across the two outside blocks when I initially sewed them together.
On the two seams between the three large focus blocks in the center of the quilt I layered pulled apart yarn and spirals cut from the black linen reverse-applique process.
Those bits and pieces are held in position with gold tulle. I then free-motion stitched around the spirals and back and forth lines through all layers. The excess tulle was then trimmed away.
THEN it occurred to me that reinforcing the back side of the seams should be done at this time as well. Reducing or eliminating the stress on the seams of large quilts constructed this way is a good idea.
I cut strips of fabric on the straight of the grain. These are 1 3/4" wide, folded in half and stitched with a 1/4" wide seam.
I don't know what these flat heat resistant plastic bars are called. They come in a set. Their purpose is to make tubes of fabric without having to turn anything inside out. Insert the bar, twist the tube so the seam is laying in the center. Steam press the fabric flat. Then advance the bar to the next section of the fabric tube.
I blind stitch the tubes over the seams. This is not the fun part, but it's necessary for fine craftsmanship in construction.
It THEN occurred to me that adding details such as the metal spirals will be easier to do before the pieces get any bigger. Sooo... that's what I'm doing now. I'll get back to the subject of designing this quilt soon.
A step off the beaten path to a fun and eclectic boutique. Shop for fashion forward footwear from a unique collection of original designs and brand names. A world of fashion for your feet. Quality combined with comfort, high fashion, vogue, chic, sexy and funky. Come to our store located at 369 E. Main St. Ashland, OR 97520, Shop Online Or Call 081515230266 (ABDULLAH ARIF
Monday, January 28, 2008
Friday, January 25, 2008
The Real Lake and MY Lake
This is how the real lake looks today.
This is the lake in MY imagination.
Lake #52 - 13"x 11"
I've been watching the ice and snow build up on the shoreline where our cottage is in Michigan through the webcam that's posted in my sidebar (live pictures changed every 30 seconds). Just days ago there was running water in the channel and waves lapping the beach. Brrrr....I'll keep dreaming of warm summer days on MY lake.
Our son took a picture with his iPhone on his bicycle ride to work this morning in downtown Chicago. It's zero degrees up there today. It is beautiful, but it's not my lake.
I've been watching the ice and snow build up on the shoreline where our cottage is in Michigan through the webcam that's posted in my sidebar (live pictures changed every 30 seconds). Just days ago there was running water in the channel and waves lapping the beach. Brrrr....I'll keep dreaming of warm summer days on MY lake.
Wednesday, January 23, 2008
By George, I'm Getting There...
This is what my design wall looks like today.
Yesterday I had done the reverse applique and couching on the black linen. All those small colorful spirals do not work (photo below). I had thought the red color and mass of them would dilute the focus on that bright orange block near the center of the top of the quilt. Wrong! They are too much ... too busy ... they end up fighting for attention.
I also added a posy to the corner of my block as well as cutting off the top section and adding a triangle of the red side of the upholstery fabric (part of the frame around the center section). I like how the red suede strips runs into the partial spiral. Also how an implied horizontal line runs across from the top of the light blue fuzzy background block. PLUS that triangle of muted orange extends the orange over into this corner of the quilt in a subtle way.
Since small spirals didn't work, how about larger ones with little color? I cut a piece from the same discharged linen I had used in the center section. Now, that's more like it. A partial spiral peeking out from under the orange block does soften its edge. The size of these spirals are similar to the that of the posies ... a nice repeat with variation. How would it look if there were more of them?
I photocopied a section of that fabric. Cut out paper motifs are pinned in place. This number and size of spirals play nicely ... they fill in the area, they're similar in size and color to the posies which helps to integrate them into the whole, plus they're a repeat of those in the center panel. Also, their size creates a transition between the big blue and red spirals to the one in the corner block.
I need to play a bit more with the distribution. I like more of a spiral peeking out from behind the orange, but I don't like that it's lined up even with the big blue one. I'm also pleased with one of these spirals completing the partial shape in the upholstery fabric.
Now to find that particular stamp and get out the soft scrub to discharge additional spirals where I want them to be in this area.
Monday, January 21, 2008
Repeating Lines
Repeating details of lines and shapes is what I've been working on while the quilt is in small pieces.
There are a number of narrow stripes throughout the piece ... in the border print and especially in the center focus block. To repeat that design line I have couched a flat variegated red faux-suede trim through the center of all the yellow stripes. This is not only repeating the elements of line and red, but it also breaks up (interrupts) the width and prominence of the yellow stripes.
My block needs another posy in this half. I cut a circle of the base fabric and pinned it in place. Tomorrow I'll couch the yarn spiral over it. Notice the metal spiral paper clips hanging in the center of the broad brown stripe? Now that's a MUST! I have about of a dozen of them here. The rest of them are in Michigan. So I got online and ordered a box of 50 clips. The postage costs nearly as much as the product. Sigh! The peril of living in two different places is that what I need now isn't here, but there. Sigh!
I like the idea of continuing the red suede trim through the top of that "big" orange square over to the corner block. This helps to quietly define the border at the top. I'm still considering what to put in the area to the left of the orange square.
I use a fabric pencil to draw circles on the fabric to size the spirals in the spot I want them to be. The red reverse applique spirals were sewn within these drawn circles today.
It's coming along. I'm spending more time pondering than actually stitching. Both activities are part of the process ... part of the journey. As many of you know, the thinking, visual exploring, and "what if"ing parts can't be hurried. The sewing parts just take time and skill. I appreciate all of you who are hanging in there with me.
Sunday, January 20, 2008
Just Sewing and Considering
The discharged black linen has been layered with other fabrics for reverse applique and is now fit into the previously empty spaces.
I'm sewing reverse applique blue spirals into a long horizontal strip. Left alone they get visually lost. Couching yarn around the shapes makes them noticeable ... but not too obvious. These spirals add subtle interest and a bit of complexity but remain in the background while functioning to get some bright blue over on this side of the piece.
Red is layered under the black linen in that upper left corner. I'm trying to think of the best pattern for that area ... something to soften that strong edge of the orange square.
I'm getting anxious to get this top portion puzzled out so smaller pieces can be stitched together into larger units. Then I'll be able to move everything up on the design board and figure out the bottom section. In my minds eye the proportion of the bottom has always been wider than the top one even though the photographs have pictured otherwise. As I've concentrated on each section, there's been thought and consideration about the whole piece.
I've created an album of photos that record the progression of this piece through my designing process. Click on the picture of the center square in this quilt in the sidebar. A new window will open in Picasa. There's a button to make a slideshow with captions.
Now to turn on that Packer/Giant football game. GO PACK!
Saturday, January 19, 2008
Progressing
The upper right corner is coming along. I'm pleased with the reverse applique on the discharged black linen block. Yarns are couched over the cut edges of the appliques, plus there are couched yarn spirals filling in the background. The variegated yarn outlining the circles looks like neon lights.
I've worked on the four 6" blocks for each of the corners. They began as blocks made for Caron's "and still counting" project. These are stitched with variegated floss (2 ply) and she really wants those spirals for her project to be stitched with black thread.
A variegated yarn is couched next to the rows of colonial knots. My free-motion echo quilting is a bit crude because there's no extra fabric to grasp for ease of control while stitching it. Oh well ... I think the wavering lines exudes extra energy.
PS: An album of photos for the documentation of this project is located in the side bar. Just click on the cover photo. Another window will open in Picassa to view the album of photos.
Friday, January 18, 2008
Refining & Expanding
This is how my design wall looks now. A bit less of a "mobbley gobbley mess". The center section has been refined. I'm pleased with the striped border print that helps frame it. Using a different set of stripes on each side has off-set the symmetry. The rest of the bordering is upholstery fabric with different colorations on the front and back. I've used both. I like how the those borders extend up and down the sides. These extensions define the width of the piece (about 48"). They've also given me a notion where the top and bottom will end which helps define the design areas above and below the center section.
The group of spirals in the center of the top section has grown. However, I've since moved that yellow square from the bottom left corner of the grouping. As you can see, there's been more cutting of Patty's yellow block with the deconstructed aqua spiral. I also trimmed and cut J.C.'s large block with the multiple circles. Being a whole 11" block commanded too much attention. Now, there can be a repeat of those shapes and colors in the bottom section. A path of distribution has also been decided on for the circle/spiral fabric.
Last evening I got out my gold metallic paint and Liquid Matte Medium. On the left is the original fabric. The center piece has been discharged and spirals quilted within the circles. On the right, paint mixed with the medium emphasizes the spirals AND adds more dimension. I'm thinking of these as lights. I'm thinking of shopping in a souk at night ... colored lights, colorful ware for sale, and dark mysterious corners/passages ... intriguing confusion.
I know the areas to be filled in will have dark value fabrics. I printed out a photo and used a black crayon to color in the white spaces. Then I scanned it back into the computer. Someday I'll figure out how to employ Photoshop to do that. Here's a black and white copy to see how the values are distributed and working together.Today I'll continue quilting fabric for those empty spaces. There's another piece of black linen with a different pattern of discharged spirals printed on it. I'm thinking of layering two pieces of fabric under it (a red and a blue) with the intention of cutting reverse applique-work red, or blue, spirals. I'll continue to think about that while I cut pieces of the striped border fabric I quilted up yesterday.
At this point I'm still working with design units. Arranging and rearranging ... finding and making the pieces to fill in the puzzle. All the while there are considerations for the composition of the whole piece. Next I'll explain the placement of these units in the context of visual flow and balance.
Woo Yoo! Jenclair of Bayou Guilts has listed me for the "You Make My Day" award. I very much appreciate it. But, again, there're way too many blogs that I read that make my day to select just ten. If you're reading this and leave a comment, please consider that I've tagged you for this making my day award.
Wednesday, January 16, 2008
Design Wall Work
Back when I began quilting I had taken a week long workshop with Nancy Halpern. One of the exercises was to design a block and then to construct multiple blocks using different fabrics for each. At that time I had figured out it was more fun just to play with each block ... choosing fabrics that worked together within that limited area. It was more difficult to choose fabrics to coordinate a new block to the ones already made. In spite of Nancy's advice against it, that is how I made the majority of blocks for this quilt ... playing with each block without consideration to those already constructed. All this was new to me and some of the N's got made backward ... just another variation on the block, right?Since that early experience, it's been my preference to design compositions for pieced projects from multiple units that are already made up. Block exchanges are definitely a challenge. Here's a wall hanging from a previous exchange with many of the same quilters who made the spiral blocks for me. The theme for this one was "flowers in a container". To read details about it go here.
"Psycho Deco Fleurs" - 32"x 41"(2005)
I can't say I'm not a bit nervous about this piece being successful ... especially since I've publicly committed myself. I'm crossing my fingers and relying on my past experience that this piece will eventually work.
Thanks to all of you who are leaving comments about the posting of my design process. Some of them require/inspire a response from me.
- J, I've very much enjoyed reading your accounts of constructing your wonky quilts. Making order out of chaos most definitely applies to this project. My husband's observation about what's on my design wall is that it's a "mobbly-gobbly mess". He's not shy about expressing his opinion. Many times he's "commanded" me to "stop right now" before I ruin it (whatever is on the design wall). I just shoo him out of MY studio and continue working.
- Quilt Pixie and Kay, cutting up someone else's work can be touchy. The blocks in this exchange are some of the elements for an intended larger piece. The ones I've cut within this piece were done to make the scales of size and color more workable. As the artist, it's my responsibility to make the best use of these contributions. That may necessitate slicing, resizing, or even eliminating. A block for the "Fleur" quilt ended up on the backside.
- Karoda has suggested a title(s) ... swinging zen OR my zen is swinging. Thanks, that's not bad. However, I'm seeing/feeling Africa in this piece, specifically North Africa.
I can't say I'm not a bit nervous about this piece being successful ... especially since I've publicly committed myself. I'm crossing my fingers and relying on my past experience that this piece will eventually work.
Monday, January 14, 2008
Designing A Composition
Well, this piece is just beginning to exhibit some order and sense. I've cut apart some of the blocks to help distribute colors as well as particular lines and shapes. Also, some of my stash fabrics have been quilted and distributed.
There are as many different ways to come up with a design as there are artists. We each have our own quirks and there are no formulas. Every step in creating a design involves choices that solve problems, and the selections are determined by thinking and employing the principles of design:
Relationships become evident. Even though there are spirals everywhere in this piece, there are different moods in their lines and colors. How to group and to distribute them throughout is my biggest challenge. Right away I saw saw a connection between these two:
The top one is the most distinctive and complex of all the blocks ... in fact, it seems to be telling a story. The bottom one seems to be supporting/echoing that story ... much like a crowd or tribe. To help carry through that thought I sliced the right one on a diagonal and placed half on each side of the focus block. This also served to distribute those bright orange bead spirals. The blocks are completed with a black linen fabric that I had discharged with a fancy spiral stamp several years ago. Chance or accident is also an element in art.
These isolated spirals floating on background colors that are complementary to each other are paired in mind.
I sliced the top one to make two pieces to more evenly distribute that strong pattern and texture. They play nicely with the squared up orange and blue block. Plus the trimmings from that block shoot streaks of orange out into the whole piece. Down the road those black springy spirals from a notebook spine will get distributed across the quilt.
These three blocks feature strong pure hues and exude a feeling of playfulness. It won't be difficult to distribute them as they are throughout the composition.
However, they could use some help, so I quilted spirals in the brightly colored circles on a black background. But first, I played with a bleach pen on that fabric. I drew bleach spirals within each circle and made random dots on the black fabric between them to give a bit more complexity to that simple patterning. It's been cut into five pieces and distributed throughout.
This is just the beginning of the process to get all of these blocks into a unified composition. I've got a long way to go before it can be considered to be a piece of art. Right now, it's just fabric blocks on the design wall. I'll write more about my thoughts and decisions as it progresses.
There are as many different ways to come up with a design as there are artists. We each have our own quirks and there are no formulas. Every step in creating a design involves choices that solve problems, and the selections are determined by thinking and employing the principles of design:
- proportion
- balance
- emphasis
- rhythm
- lines
- shapes
- colors
- textures
- space
Relationships become evident. Even though there are spirals everywhere in this piece, there are different moods in their lines and colors. How to group and to distribute them throughout is my biggest challenge. Right away I saw saw a connection between these two:
The top one is the most distinctive and complex of all the blocks ... in fact, it seems to be telling a story. The bottom one seems to be supporting/echoing that story ... much like a crowd or tribe. To help carry through that thought I sliced the right one on a diagonal and placed half on each side of the focus block. This also served to distribute those bright orange bead spirals. The blocks are completed with a black linen fabric that I had discharged with a fancy spiral stamp several years ago. Chance or accident is also an element in art.
These isolated spirals floating on background colors that are complementary to each other are paired in mind.
I sliced the top one to make two pieces to more evenly distribute that strong pattern and texture. They play nicely with the squared up orange and blue block. Plus the trimmings from that block shoot streaks of orange out into the whole piece. Down the road those black springy spirals from a notebook spine will get distributed across the quilt.
These three blocks feature strong pure hues and exude a feeling of playfulness. It won't be difficult to distribute them as they are throughout the composition.
However, they could use some help, so I quilted spirals in the brightly colored circles on a black background. But first, I played with a bleach pen on that fabric. I drew bleach spirals within each circle and made random dots on the black fabric between them to give a bit more complexity to that simple patterning. It's been cut into five pieces and distributed throughout.
This is just the beginning of the process to get all of these blocks into a unified composition. I've got a long way to go before it can be considered to be a piece of art. Right now, it's just fabric blocks on the design wall. I'll write more about my thoughts and decisions as it progresses.
Sunday, January 13, 2008
Spirals on the Wall
All those wonderful spiral blocks from the exchange are on my design wall along with additional fabrics from my stash including the folded ones laying in front.
Also included is the spiral flower block that I had made last summer. It was not successful by itself, but will work nicely with this group. Now to begin quilting pieces of the stash fabric and slicing and arranging all of them into a composition. I'll explain and post photos of the construction process for pre-quilted blocks when I get there.
Another task I caught up on is this 8"x 4" block made for our guild's out-going president.
She designed the block with stipulations for a black and white fabric, a personal choice fabric, and a white one with our name and the year we joined the guild written on it ...plus a button sewn in the center.
Friday, January 11, 2008
My Blocks in the Bee Exchange
These are the 8 blocks that have been made for me by the SMQ Guild members of Thursday Bee. My theme request was "spirals" with no limitation for size. Another requirement for all of us, other than making one a month, was that the blocks be layered and quilted.
by Jane - 12" x 9"
(the black things are cut up spiral binding for notebooks and the blue background is an "eyelash" fabric)
Subscribe to:
Posts (Atom)