Wednesday, May 3, 2006

Collage Quilt Technique

On last year's visit my friend Alicia saw my friend, Sheila Rauen's , book titled "Sassy Cats" in my studio. That gave her the idea to make a piece depicting the cat that lives with her daughter's family. Alicia followed the pattern pretty closely from Sheila's book, but she used my collage technique to execute it.

The technique I've come up with is:
- Lay down a backing fabric wrong side up
- Lay batting over backing fabric
- Layer a background right side up on top. Spray a light coat of adhesive onto the background fabric. I use Sulky's KK2000 Temporary Spray Adhesive because it disappears within a few days.
- Cut out and arrange the elements of the design.
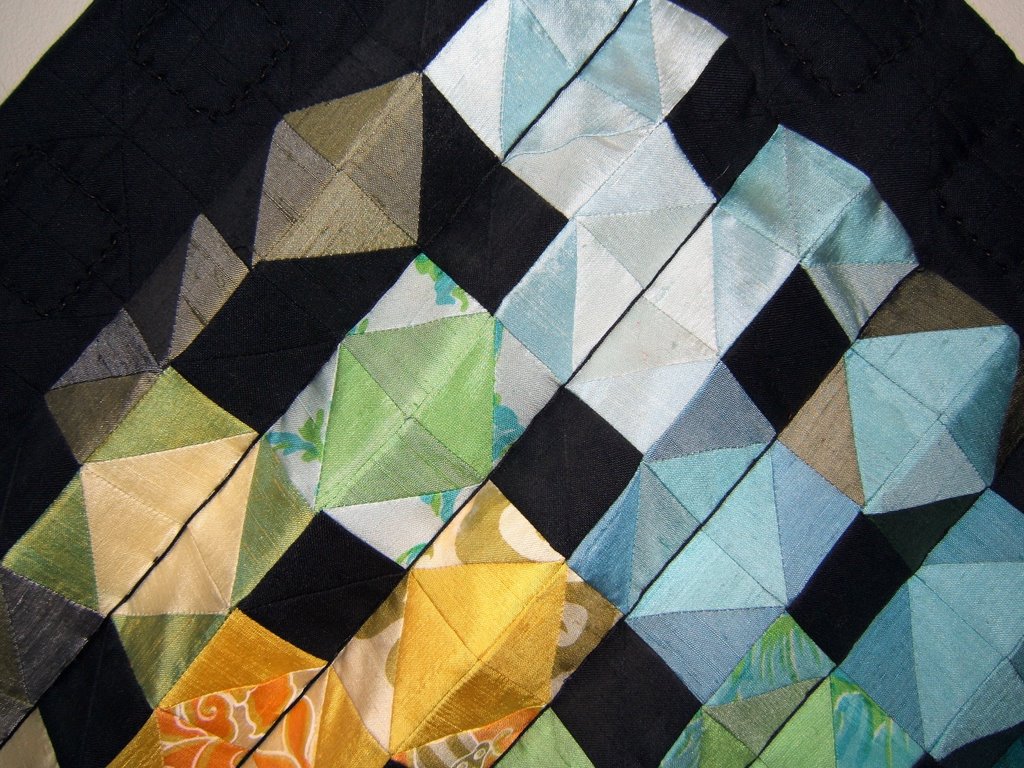
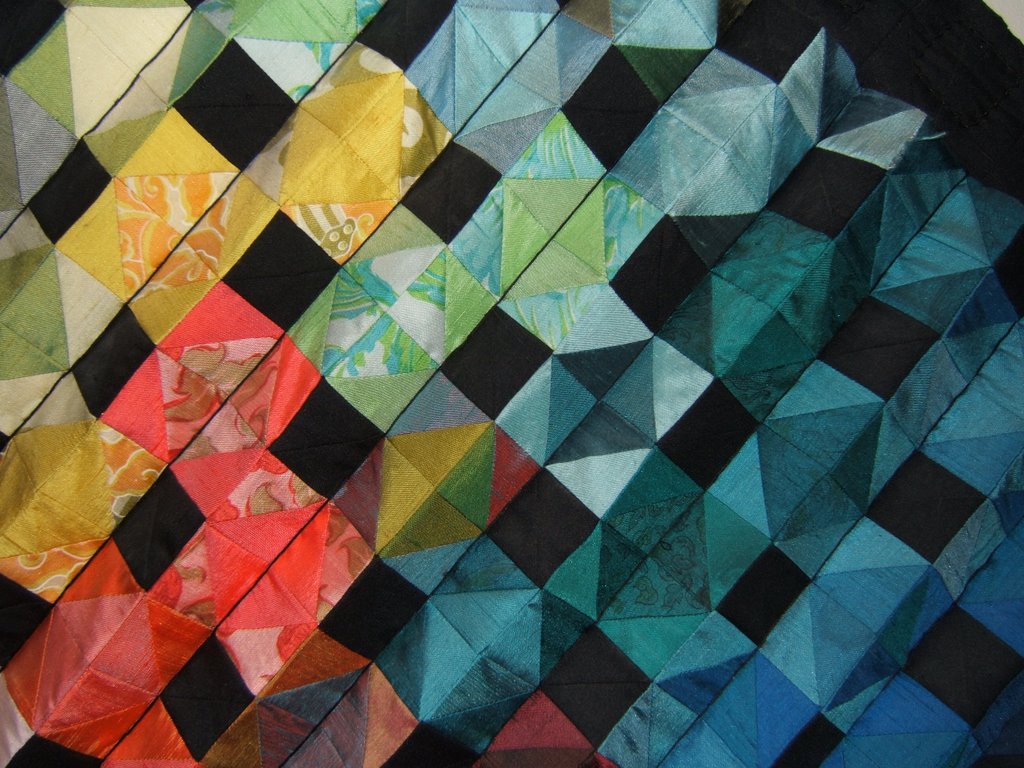
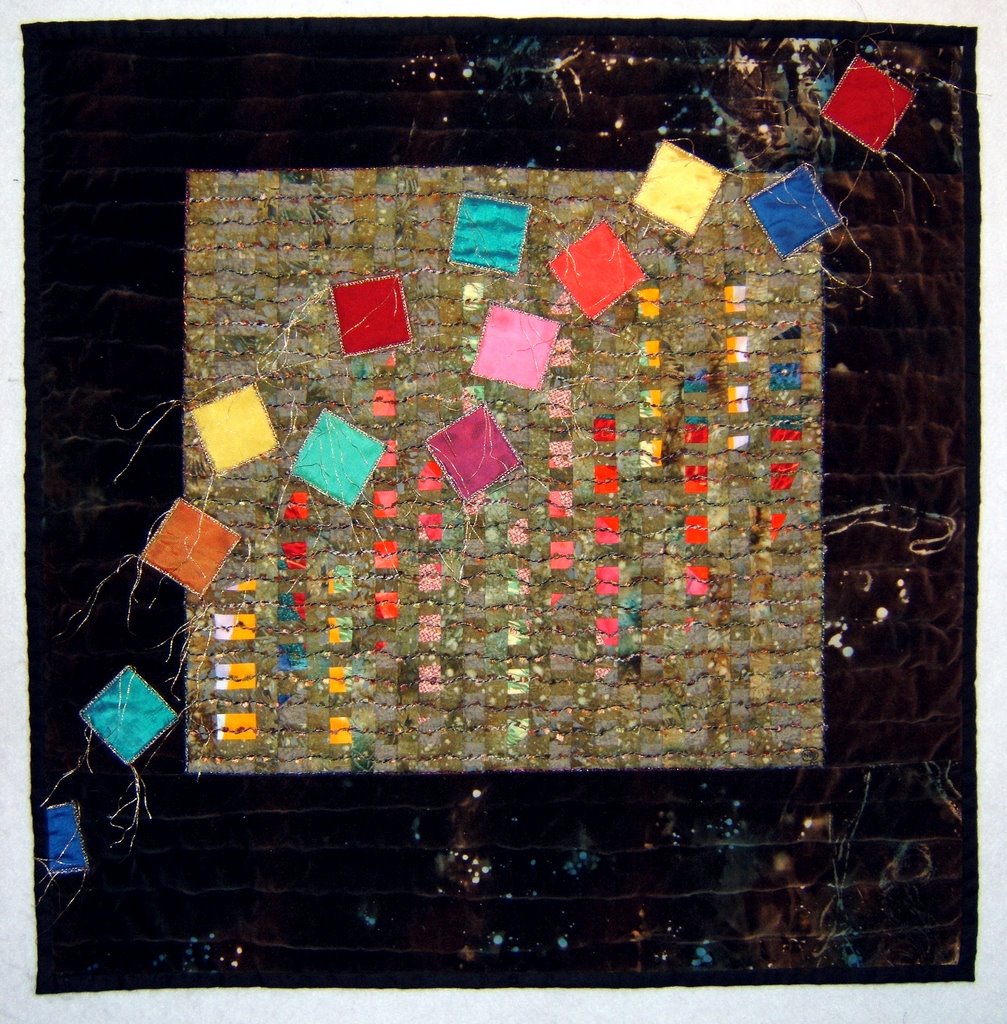
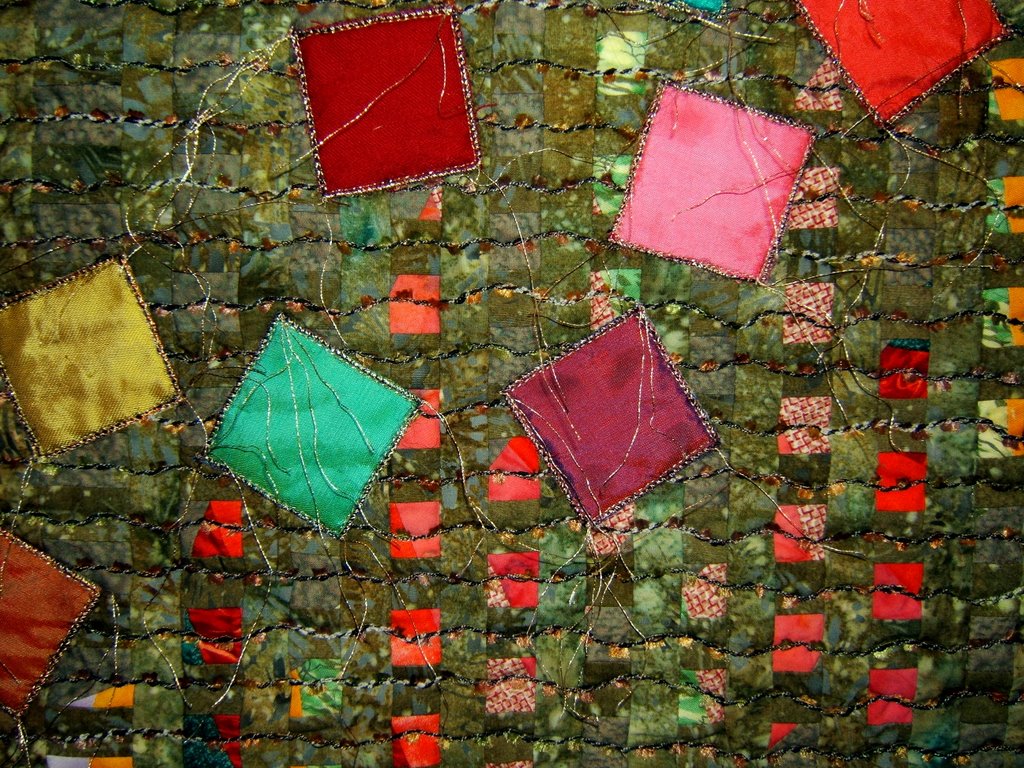
- Top it off with a layer of tulle to capture and hold all those loose pieces. I audition various colors of tulle by trapping the lower edge of the tulle against the table top with my body. I lower the tulle over the piece making sure there is no contact, because the loose pieces in the composition are easily "picked up" or disturbed by any direct contact in spite of the adhesive. Each color gives a different feel, or mood, to the piece.
- Cut the tulle netting slightly larger than the piece. Spray the "under side" with the Sulky adhesive. Layer the tulle over the finished composition.
- Pin baste all the layers together.
- Machine quilt the piece. Begin by stitching around the outside perimeters and get a few major lines across the piece so you can remove most of the pins. Complete the desired quilting pattern(s).

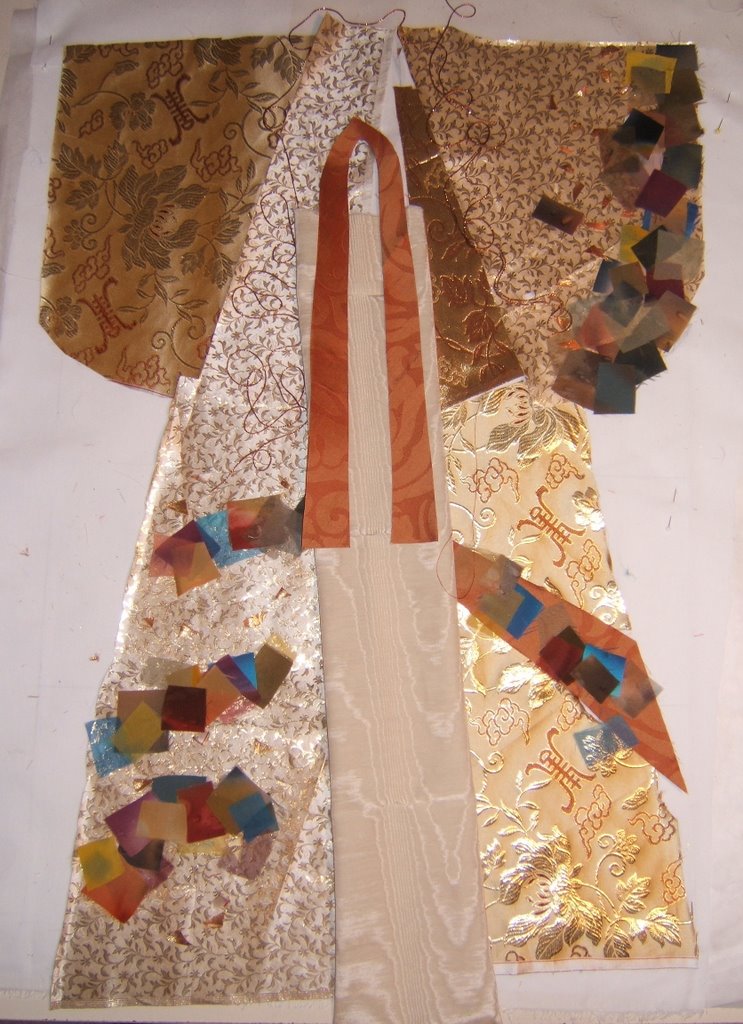
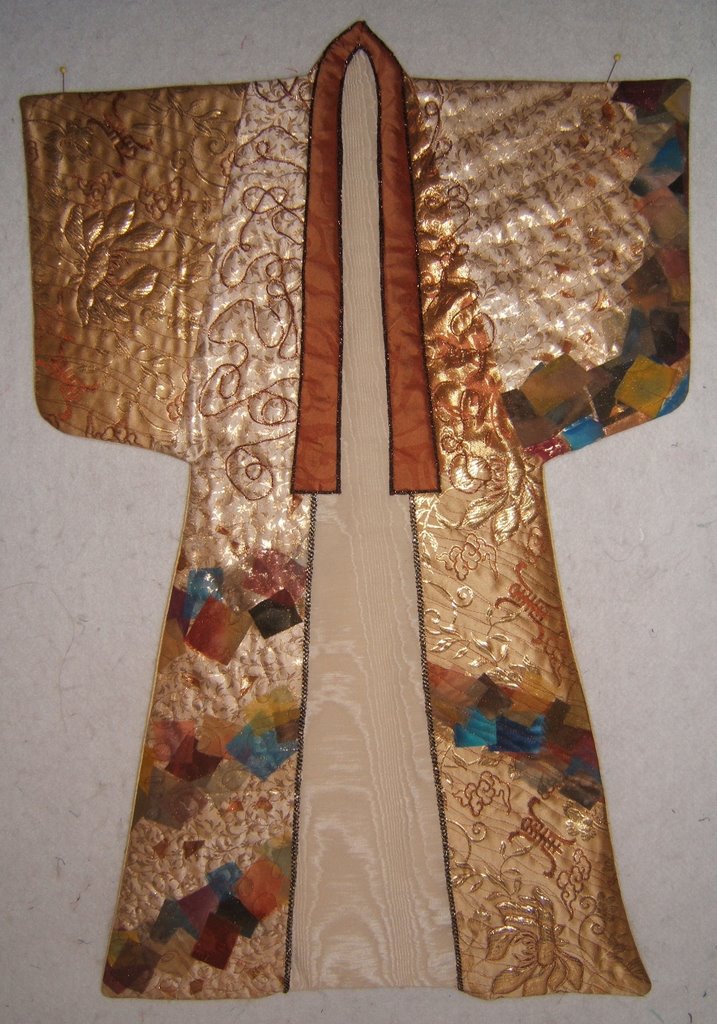
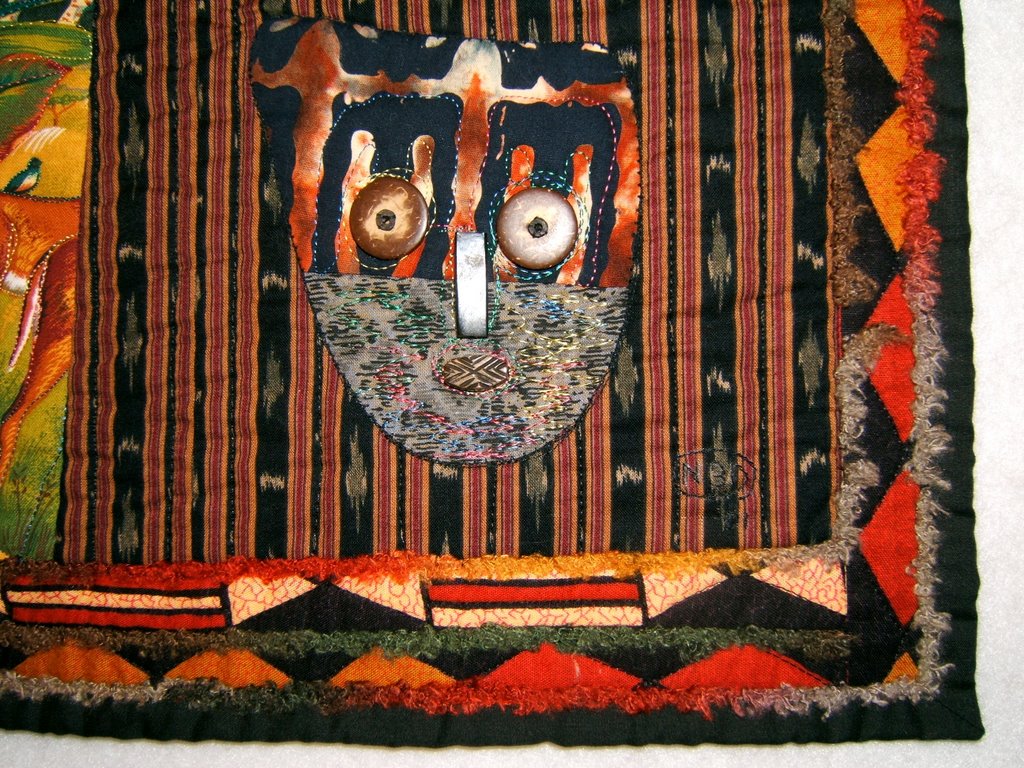
Embellish the surface with couched yarns or threads. Also, oil stick pastels, crayons, or paint can be applied over the tulle to emphasize (or mask) design lines or areas. The cats whiskers and highlights on the glass bowl are made with pastels. There are two layers of tulle (one that is white) in the area of the water.

This collage technique executes design ideas rather quickly because all the raw edges are confined under the tulle. Also, it's a lot easier to play with and place (or remove) all the elements within a composition because nothing is stitched down. It's fun!

Tuesday, May 2, 2006

Accordian Quilting

I had previously mentioned "accordian quilting" in the posting about Market Mania. Here's the first piece (as well as being my first quilt ever) made in this technique.
Patchwork Perspective - 1993
36"x36"(point-point)

Materials: Thai silk fabric samples, variety of black silks, silk thread, Strathmore acid free paper.

Technique: Strips of heavy Strathmore paper the length of the pieced area and the width of two squares were cut. Each strip was scored down the center of the length with an exacto knife and gently folded to form a long tent. All the strips were layed under the pieced area over a larger prepared background that extended to make a border. I fiddled with the positioning of the paper "tents" to space them evenly. The seam allowances on the long smooth sides were tucked under the paper and blind stitched in place. The seam allowances on the tented sides were folded under and finger pressed. I used a curved needle to sew the pieced top to the foundation along the valleys between the peaks of the tents. These running stitches were also the quilting stitches. I whipped another strand of black silk around them to make solid lines visually.


I used this form of presentation because I liked the dynamics of the visual distortion and movement of the squares. The piece literally dances before your eyes.

My intention was to make all of my quilts with this technique. However, learning the craft of quilting (including precise piecing without using 100's of pins) waylaid that plan. It was three years before I made "Market Mania" and I haven't yet made another in this form.

"Patchwork Perspective" was a Christmas gift to my older son and daughter-in-law. It hangs in their livingroom in Evanston, Illinois. I love visiting it.

Monday, May 1, 2006

Whipped Quilting Stitch

I'd like to share a technique that makes a solid line of quilting as opposed to the broken line of running stitches usually created by a row of quilting stitches. This method is called the "whipped running stitch" in embroidery. I use a tapestry needle/size 24. This needle has a large elongated eye and blunt point.

It seems I've been embroidering all my life ... beginning with tea towels when I was 8 years old. So when the square shapes that I had quilted with black thread on a black background didn't show up in my first quilted project I decided to make a visually stronger line by whipping a different type of silk thread around the quilting stitches.

A few years later I had the problem of my quilting pattern dissappearing on a newsprint fabric in the piece, "Market Mania". I wrapped my quilting stitches with the same thread I used to quilt the shapes to make it more visible.

On this piece, "Beyond the Rainbow", I wanted to use shiny threads that were too fragile to quilt with ... they shredded after just a few stitches. I like the visual effect of fine solid lines glittering over this piece rather than the more subtle effect of a background quilting pattern.

I've also used this whipped stitch technique to make quilted words stand out (sorry there's no photo and those quilts are long gone). Using heavier threads in strong colors raise up on the surface. Also, nice curves can be gotten with the "weaving" over irregular quilting. It sure beats embroidering through all those layers. Plus the back of the quilt isn't messed up with partial stitches and knots.

Sunday, April 9, 2006

I'm Back

Finally, I'm back online. My server connection went haywire and then my friend from Milwaukee came for an extended visit. Our time together is intensely busy and I just couldn't face dealing with server problems while she was here.

When I'm with my friend, Alicia, we always come up with ideas that end up as major projects. Usually we work on the same type of creation. I'll feature some of our parallel projects in future postings.

This year she desired to make a kimono wall hanging for her living room. Here it is layed out for the collage technique that I use (tulle netting placed over loose pieces - the quilting holds everything in place).

Most of the fabrics are silk remnants. The small squares are small silk fabric samples that were cut even smaller.

Here it is finished. I contributed the free motion quilting. Otherwise, it's all her doing.

"Oriental Robe" - 22"x28" by Alicia Mullins - 2006

Alicia is full of wonderful ideas,but lacks the facilities, materials and "know how" to execute them. I'm most pleased to share my studio, stash of supplies, and knowledge to help her make them real. I miss having this exquisite piece hanging on my design wall.

Wednesday, April 5, 2006

Reflections

"Reflections" - 26"x26" - 2002

This piece had its beginning in the workshop, Twisted Ribbons, conducted by Ricky Tims in Pigeon Forge, Tennessee. The objective was to learn curved piecing. I decided to choose my fabrics by value rather than hue to get the effect of a dimensional ribbon twisting through space. Those values were selected from pure hues to go on a muted background. I learned Ricky's technique, but the result was the ugliest, most garish thing I had ever made.

I cannot throw anything away ... there had to be a way to "recycle" this piece. I had also taken Ricky Tim's "Harmonic Convergence" class the same week, so decided to use aspects of that technique to salvage this piece. The ribbon piece's background was a fat quarter of batik fabric. I had another fat quarter of a similar batik. I cut the ribbon piece into 1" strips and inserted 1" strips of the new batik. That helped, but it still looked awful, so I cut and stripped in more fabric from the other direction. That was better. Now, I don't recall if I cut and stripped in additional fabric one OR two more times. I mixed up the order of the ribbon strips in the process. I stopped cutting and sewing when I saw what looked like reflections of lights in river water to me. I needed something to cast those reflections. A dive into my stash came up with 2" squares of silk fabric samples.

The gold metalic threads around the silk squares float away from the surface. Tails were left at the beginning and end of the zig-zag stitch seams on each side. Yarn couched in a wave pattern is the quilting in the center panel.

Since this obviously was "night" I needed a dark frame. The velvet border fabric that was discharged (bleached) and painted by Jan Lewis of Evanston, Illinois was perfect. She had given me the piece in exchange for working out of my fabric stash at workshops we both attended at Arrowmont in Gatlinburg, Tennessee.

This piece is one of the few out of the 244+ quilts I've made over the last 12 years that I've kept to hang in our living room. Its hanging space gets a rotation of a selected small group of quilts. I'll indicate which those are when they get described in the future.

Tuesday, April 4, 2006

Toonga (Adventure)

Toonga - 37"x40" - 2002

Description:
Toonga (an African word for adventure) is the second piece in my African series. The fragmented images symbolize my perceptions of Africa ... from a jungle safari to structural and native patterns. I'm also fascinated by the way a herd of huge elephants move so quietly that their presence isn't known until you see them ... plus there is the camouflage of foliage and shadows. You hardly notice them at all in this composition.

Technique:
Machine quilted, machine pieced, hand applique. Yarns are couched to the surface with machine zig zag stitches. The center panel is pieced using Ricky Tims "harmonic convergence" contruction technique.

Materials:
cotton fabric, cotton and polyester threads, beads, yarn, cotton batting

Exhibitions:
2002 Dogwood Arts Quilt Show - Knoxville, TN
awarded Third Place
2006 Festival of Quilts - Farragut, TN

Detail Photos:

Monday, April 3, 2006

Criss Cross

"Criss Cross" - 60"x60" - 1995

Description: Based on an 1898 block called Fort Sumter, from "The Quilter's Album of Blocks & Borders" by Jinny Beyer.

Techniques: Machine pieced and hand-quilted.

Materials: cotton, wool, and silk fabrics. Center squares and "dots" are from recycled clothes. Most others are fabric samples. Sashing and borders are cotton chintz.

Exhibitions:
1995 Dogwood Arts Festival - Knoxville, TN
Judges Choice Award
2006 Festival of Quilts - Farragut, TN

"Criss Cross" is the third quilt I made. It's one I never intended to make. Just before this, I had pieced a twenty-five block top using this same block pattern for a 50th birthday present for my younger sister. The only excitement for me in making that quilt was embroidering the names and birth dates of her six children and many grandchildren in the center squares. Our mother, Lira Froit, hand-quilted it.

I noticed the secondary pattern that formed when the blocks were sewn together and began to wonder "what would happen if" I ran and connected colors though the design. The corner squares are the colors that would happen if the hues on each side of it were mixed together.
TVA (Tennessee Valley Authority) wanted to add this piece to their corporate collection. However, I had already given it to my husband for Christmas.