Showing posts with label Cuddle quilts. Show all posts

Tuesday, November 9, 2010

A Mended Quilt

You may recognize this silk quilt I had made as a Christmas present for my friend in 2007 ...
The original areas where it's green had been constructed with old silk that had "shattered".  Darn!  That had been the perfect color and foil to the bright pink and orange prints.  Also, I hate mending, but this is one  quilt that really needed my personal attention.

It's now been replaced by sewing a new and modern soft green "silk cotton" over the top of the old silk.  The seam allowances had been pressed under on all the newly cut border pieces. Those were then machine appliqued with clear mono filament thread on the quilt top just outside the seams into the edges of the pink silk prints and binding.

For the quilting I followed my original quilt lines by free-motion sewing with the back side face up ... which meant putting the fancy variegated silky thread in the bobbin while having the plain beige thread set up on the top of the machine.

I'm pleased with the results and the quilt in now on it's way back to my friend in Milwaukee.  To read the post written about the creation of this quilt go here.

Thursday, February 4, 2010

Quilt Backings

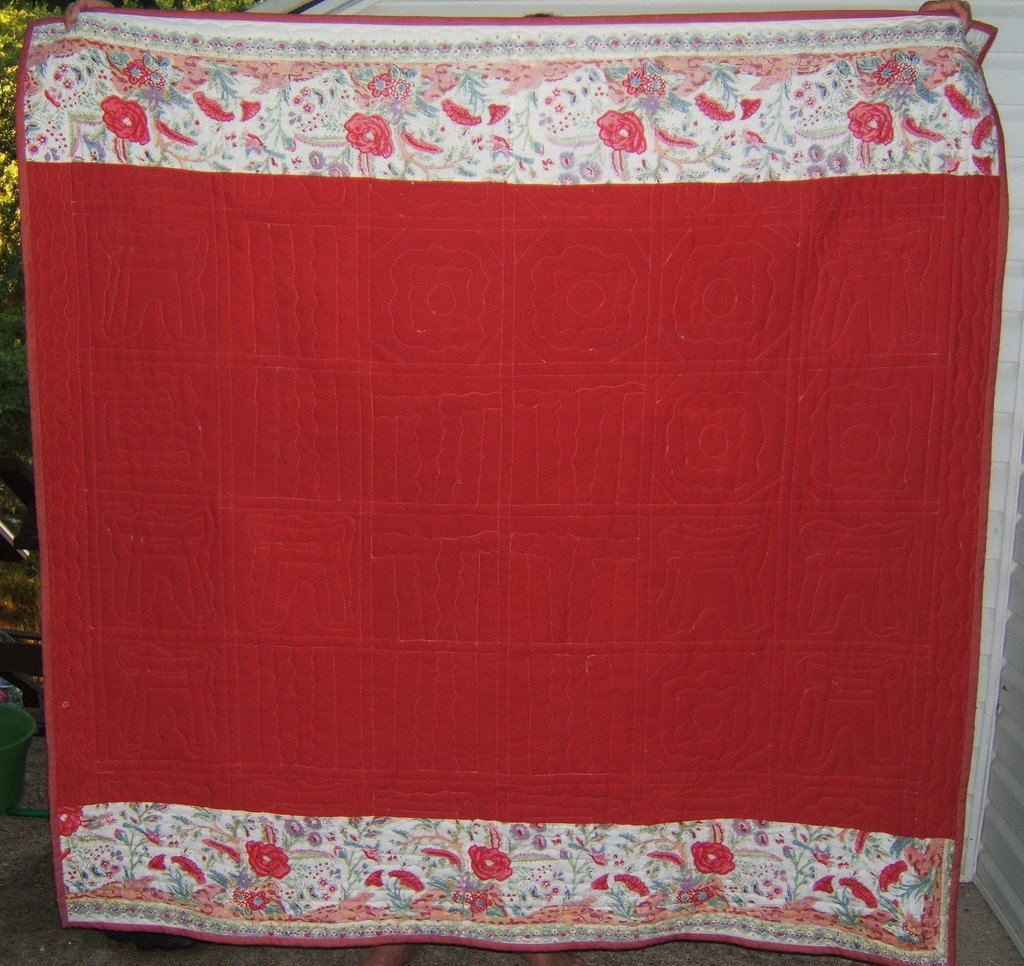
Making the back for this cuddle quilt is what prompted me to clear the work table. The quilt is destined as a gift for a new great-nephew after being exhibited in this years Smoky Mountain Quilt Guild show in March.
Follow the Yellow Brick Road - 53"x 53"
It's designed to be a story telling quilt. Pick a square to begin, "Once upon a time…" Then follow the yellow brick road to another block for a clue to tell the next part of your story. Continue following segments of the yellow brick road to get to "the end".

I like to make pieced backings. One of my favorite ways features a big diamond in the center. I begin by cutting a square from my chosen fabric. The size of it usually depends on the amount that I have. To figure out the pieces for the backing I begin by positioning that large square on the diagonal in the center of the quilt top.
The next step is to figure out which fabric and how much is required to fill the corners. I have no mathematics for this. I position pieces of fabric over the areas of my quilt top to make sure they're large enough. For this quilt there were yards of the star fabric that I chose for these corners. I determined that a half-square measured by folding the width of the fabric on the diagonal would cover a corner. I had enough yardage that I could cut two big squares to get four triangles.
Note that the straight of the fabric grain on that triangle lies on the outside edge of the quilt.

To begin assembly of the quilt back, align the centers of the middle square and a triangle shaped corner. Pin the edges together taking care not the stretch that bias edge of the triangle. Sew them together ending the seam 1/4" in from the edge of the middle square.
After stitching the seam, cut away one small triangle corner of fabric that extends beyond the edge of the middle square. Then press the seam so it extends away from the middle of the quilt.
Sew the adjacent corner piece to the middle square and the newly cut straight edge of the first corner. Cut off the small triangle from this second corner fabric that extends beyond the middle square and press the seam. Do the same with the next adjacent corner ... sew, cut away small triangle, and press.

Sew the fourth corner to the middle square and the third corner piece. Cut away the excess small triangle. That cut edge will be even with the cut edge of the middle square.
Match the edge of the fourth corner to that of the first corner to complete that partial first seam.
Here is my completed quilt back.

I usually work from my stash and many times the fabric I want to use is a limited quantity so I play with the layouts. Many times those corner areas are pieced because there's not enough of one fabric to fill that area. The quilt back pictured below is made of linen fabrics. I had a great big piece of the center square and a much smaller piece of the fabric used in the corners. White linen was used to fill in gaps.
Again, I determined the layout by laying all the pieces out on my quilt top to make sure there was enough to do the same design in all four corners.

I don't recall if this back is more complex by design or if my yardage was limited. All I know is that it suited the bed-size quilt it's made for.

Thursday, October 22, 2009

Secret Windows

This quilt, "Secret Windows", spotlighted the Smoky Mountain Quilt Guild Show at the 1998 Dogwood Arts Festival.
It was begun from a collection of scraps back in 1994 when I was a new quilter. A classmate in a one week workshop with Nancy Halpern was throwing out scraps of material that were larger than the fabric samples I had brought to work with. After I had made a fuss about finding them in the trash barrel, she consented to save those scraps if I found a bag in which to collect them. During the week after I got home, I sewed every scrap into "crazy quilt" squares. Originally, I had set them together to be a child's quilt that would be donated to the Ronald McDonald House
My husband and friends protested it being given away. So, through the next few years I'd occasionally make more crazy quilt squares from my own scraps. It grew into a full-size quilt that ended up being a Christmas present for our younger son and his wife.

It still looks good all these years later as you can see in a photo taken this summer.
I like to piece the backs of quilts.
The hand quilting is more easily viewed from the backside.
The crazy quilt squares set on point are quilted with satin-stitches using two strands of variegated floss. There was no way I was going to hand-quilt a running stitch across all those seams.
The portraits were cut from a shirt sewn by my mother-in-law for my husband with fabric featuring artists from the Expressionist period. It was a great shirt for the 1970's ... worn with chains at the open collar plus a wide belt with a big buckle and platform shoes. Woo Hoo! Let's do the Hustle.
This is the first quilt in which Elvis made an appearance.
I still have some of the home decorator fabric that was cut apart for the triangles around the crazy quilt squares. The printed squares are two and half inches.
Maybe I'll make another window quilt with crazy quilted blocks from the many bags of scraps collected in the ten years since this quilt was begun.

Tuesday, May 12, 2009

Take It Outback

A bit more about "Take It Outback". I thought you may like to see the back. I consider quilts to be sculptural. Therefore, the back should either relate to the front OR be a delightful surprise.
Then there's the consideration of the quilting pattern showing up or being low key. If it's hand quilted I definitely want all that work to be an obvious design element. However, my machine quilting is not great and I prefer for it to blend into the fabric. A fine black thread, Bottom Line, was used in the bobbin. A number of variegated heavier threads were used for the quilting on top.
To figure out quilting patterns I placed a piece of "Press'n Seal" directly over the fabric quilt block. I like that this product adheres to the fabric without stickiness and that it's translucent enough to see the fabric's pattern. I used a fat tipped permanent ink pen (Sharpie brand) to doodle designs I thought may be appropriate within each section. This variety was pleasing, so I stuck the "Press'n Seal" to a piece of foam core board that was propped up near my machine where I could see it as a reference while I was quilting.
Each section within the blocks was quilted separately ... such as all the spider webs throughout the quilt were sewn at one time with the same thread. Then I'd change the top thread and quilt all of another pattern.
I like taking a break from creating art to make a functional quilt once in awhile. It usually takes finding exciting fabric or being intrigued with a new technique or manipulation of traditional patterns. For this one it was finding that fat-quarter packet of Australian fabrics and playing with a variation of "stacking and whacking" to make interesting blocks that are related to each other with no two alike.

Friday, April 17, 2009

Machine Quilting

The Smoky Mountain Guild Quilt Show is fast approaching. One of my three entries has a quite a bit of work before it's finished.
I had pieced it almost a year ago intending to get the machine quilting done last summer at the cottage. Now I'm in crunch mode to get it done. A few weeks ago it got layered with the batting and backing fabric. I also machine quilted the straight lines at that time.
To experiment with quilting patterns, I placed Press'nSeal plastic wrap over one of the large blocks and drew these patterns with a fat tipped Sharpie pen.
I'm now quilting the spiderweb patterns in all the squares that have spiders. Rather than my original intent of quilting each large block, I'm quilting all the small squares scattered through the twelve blocks that will have the same pattern. Each one gets easier as I develop a rhythm for stitching that pattern. Also, this sequence gives me the option to change thread color for the other patterns.

I'd like to share my trick for getting a grip on the fabric while machine quilting. I use 3M sand paper foam rubber pads that I found at a JoAnn Fabric/Craft store in the woodworking department. It takes only a slight downward pressure for them to do their job of keeping the fabric taut and sliding it around on the machine bed. It's easy to reposition them AND my fingers are free for all the other things that have to be done while sewing.
Well, back to the machine.

Thursday, December 13, 2007

A Silk Quilt for Christmas Present

About twelve years ago I had made a silk cuddle quilt for my friend. She absolutely loved it ... to death. Silk is light-weight, soft and fluid. A silk quilt gives just the right amount of warmth for an afternoon nap no matter the season. I've made a new one to replace the tattered one that she's gallantly been trying to keep mended.
The center panel is an Anne Kline silk scarf that has special meaning for my friend. The brightly colored silk print expands the center and sets off the lion on point. The muted green calms the "shouting" orange and pink.
Her old silk quilt was hand-quilted. This one is done by machine. I was inspired by Ferrets marvelous work. Her patterning is dense, whereas I kept my variations on the spiral open to maintain a soft drape to the quilt. To help keep that quality I used Thermore ultra thin batting.

The backing is made from one of my friend's favorite dresses. She had passed it onto me, but it was more "her" than "me" so it had just hung in my closet for the last year or so. It was a wonderful batik printed rayon that had long sleeves which produced four squares in the center. The double layered bodice had enough material to make the rest of the back.
The muted hues on this side is a nice foil for the bright orange and pink silks on the other. A soft light brown cotton print for the binding bridges the two sides.

Sssshhhh! if you know my friend, Alicia.

Tuesday, January 23, 2007

"Woven Together"

Since I began quilting in 1994 I've made over fifty cuddle quilts . Many were created as gifts (wedding, birth, and graduation) and quite a few for ill children at our Ronald McDonald House. This is the one that I've kept for my personal use.
"Woven Together" - 60"x60" - 1995
It is made of chambray and hand-dyed muslin fabrics. This is the only fabric I have ever dyed. It was an all day affair of great fun with about six other quilters. As those of you have dyed know, you don't really see the results until many, many hours later after the pieces are ironed. I finished ironing mine about midnight of that day. I was exhausted but still too "hyped" to go to bed. I began playing with the selvedges I had trimmed off that were piled on the end of the board. I wove them together in this simple pattern ... and then went to bed.The next morning I got out graph paper and drew up the pattern to make a quilt from that spontaneous weaving. It was easier than it may appear. Several rows are the same in weaving, so I strip-pieced quite a bit. A number of the fabrics are mottled so it appears there are more than there really are.
I hand-quilted it with the pattern of lines that I saw in the "woven" area.
The embroidered words of the title are woven together. The back is pieced with a batik and the chambray. It has a knife edge finish rather than a binding. I didn't crop this photo thinking some of you may like a peek at the area surrounding my design wall.

I have since determined that painting rather than dying fabric is for me. It's less labor intensive and I can see the results a lot faster. I also think painting is less toxic than dying. The labor and toxicity are major considerations because of my fibromyalgia.

*All photos are clickable for you to view a larger version in a separate window. Click the back arrow icon of your server to get back to this post.
*Click on a label to see all postings featuring that subject.

Monday, October 23, 2006

Celebration Memorial Quilts

We had a grand Durand family reunion at the beginning of the summer. It was held to honor our matriarch, Dorothy Lee Durand, on what would have been her 100th birthday. She was a much loved and adored mother, mother-in-law, grandmother, and a favorite aunt. All of us called her "Dottie". And we were all in the place she loved most ... the cottage had been purchased by her father when she was 12 years old.
My personal way to honor the love my mother-in-law had for her grandchildren and for fabric was to make quilts from her fabrics for each of her nine grandchildren.
Here are the fronts and backs of the six I had presented at the reunion. The fabrics are selected for the other three quilts designated for my two sons and the nephew I see quite often. I plan to complete them before what will have been Dottie's 101st birthday.


For some reason Blogger won't allow me to arrange the photos to get the front and back of each quilt together. Can you guess which belong together? Can you pick out the one that I was quilting "like mad" while Aliza was making her quilt? (previous post)


I used cloth from Dottie's clothes, as well as fabrics from her shop, The Torii. She was the proprietor and buyer right up until she died at the age of 89 1/2. She imported silks, cottons, wools, linens, plus gift items from all over the world. She designed and made her dresses from these fabulous fabrics. Here are photos of just a few. I'll post more when I write about the other three quilts in the future.

Her grandchildren grew up knowing the Torii for its gifts, not really taking notice of the fabrics. On each visit to Knoxville they got to choose a gift for themselves from the wonderful array of exotic objects from around the world. As adults, I wanted to give them each a token of what the Torii was really all about for their grandmother ... the fabrics. The quilting in the plain blocks between the letters of her name is of a torii, the Japanese gate.

These quilts were created and presented with much love.

All photos are clickable for you to view a larger version in a separate window. Click the back arrow icon of your server to get back to this post. The highlighted text is also clickable to take you to the link or posting that is being referenced.