 This quilt, "Imelda's Dream" is currently exhibited at MB Gallery in Chicago, Illinios.
 All photos are clickable for you to view a larger version in a separate window. Click the back arrow icon of your server to get back to this post.
This quilt, "Imelda's Dream" is currently exhibited at MB Gallery in Chicago, Illinios.All photos are clickable for you to view a larger version in a separate window. Click the back arrow icon of your server to get back to this post.
All photos are clickable for you to view a larger version in a separate window. Click the back arrow icon of your server to get back to this post.
This quilt, "Imelda's Dream" is currently exhibited at MB Gallery in Chicago, Illinios.All photos are clickable for you to view a larger version in a separate window. Click the back arrow icon of your server to get back to this post.
 In a previous posting I explained how each block was constructed and quilted. To put the quilt together, a row of blocks was sewn together by butting the raw edges of two blocks and attaching one to the other with a wide zig-zag stitch. A narrow 1/2" flattened tube of fabric (seam pressed open on the under side) was machine appliqued on the back side to cover the zig-zag stitched seam. Then the sashing that represents the colored light framing the display was appliqued on the front of the quilt to hide the zig-zag seam as well as the two applique seams. A silver cord was couched at the edge of the sashings to give a highlight to the neon.
  After all the vertical rows of blocks were assembled, I sewed the sections together in the same way ... 1/2" sashing tube on the back, the neon light sashing on the front, and the silver cording couched to the edges.
 This way of constructing completed (quilted) sections for a large quilt works well for me. I cannot imagine trying to free-motion quilt on a home sewing machine a piece that is this large (70"x70"). I had a difficult time getting the last two sections together. I even stated rather loudly at the time as I wrestled that bulk through the machine, "This is my LAST really big wall quilt!!!" Well, we'll see if I truly meant that down the road.
 This pair of shoes began as a single shoe just like all the others. It was cut apart to look like a pair snuggled in tissue (actually china silk). The shoe fabric is an old machine-made lace dresser scarf ... making perfect footwear for a bride.
 Each block began with the same background and "shelf" fabrics. They and the shoebox were placed in the same positions within each block. I used glue stick as well as temporary spray adhesive to keep them in place. Roving was thinly spead on the shelf to ceate a darker forground.
 In the finished quilt each shoe is showcased in its own lighted display cube. Oil stick pastels were used to give the initial effect of colored light on the background fabric. The shoe and "tissue" were adhered in place with temporary spray adhesive.
  A piece of tulle colored the same as the "light" for the cube was adhered with the temporary spray adhesive over the whole block. The shoe and box top are trapunto. A thin batting was placed under that area on the wrong side of the block. I then machine quilted around and within the shoe as well as the lines of the box top. The excess batting outside of the shoe and top of the box was trimmed away.

 The block is trimmed to size. Soon I'll post about the construction of the whole quilt.
 The patterns for the different parts of the shoe are fussy cut from one fabric ... even the pom pom on top.
 Jane's polka dotted fabrics are a big favorite of mine. The shoe is one piece of the blue/green one. I fussy-cut leaves that are from a couple of different fabrics. They were dissected to fit the curves and fill the spaces of the shoe.
 I adhered the paper to the wrong side of a heavy satin fabric with the "wrong" side of the writing face up. A heavy thread was wound on the bobbin and a fine one was threaded on top through the needle. I free-motion stitched over the written words.
 The stitching perforates the paper making it easy to tear away when the embroidery is complete.
 Pictured above is the newly constructed shoe and box. Below is the quilted square.
 The fabric for the box is a striped commercial fabric that I had painted. I don't recall if I had intentionally applied the paint that way, or if I had used the fabric to clean up excess paint from something else. At any rate, I love my "paint rags".
 This is the Christian Louboutin shoe that especially intriqued me. Its silhouette is the ideal for a pump in my opinion. There is a classic elegance to this one. The curve of the heel is so graceful and sensuous. This pump looks like it would hug the foot so it would feel like it belonged there. Oh, I wish I could wear this one. Well, maybe not. I would never spend the money to buy it. Louboutin shoes are mega $$$$$.
 So, instead I had a fun time dreaming up variations of my own. Many of them have already been posted. Making these shoes was like eating peanuts. As each one was created it got pinned to my design wall. I hadn't a clue how they were going to be used at that time.
 To make a pattern I scaled up the picture from 5"s to 8"s. I did this by tracing the picture in the book and then drawing a grid over it. I then drew an enlarged grid on another piece of paper and drew the shoe within it, duplicating the smaller drawing in relation to the grid.
 The drawn pattern was refined and transferred to the paper side of freezer paper. I cut this last drawing apart into the structual elements of the shoe. This gave me the option to play with the pieces to create a great variety of shoes from just this one pattern. Some have a different fabric for each separate piece while others have several paper pattern pieces combined to make one part of the shoe.
 The pattern pieces were ironed to the front side of fabric. Then I cut out the pieces leaving an 1/8" edge on the sides where "allow"(ance) is written. Phooey, I see that I got the upper foot (vamp) pattern piece upside down in the photo. The fabric pieces were put together while the freezer paper pattern was still attached. Tiny dots of glue were applied to the "allow" edge. It was easy to align the matching piece. I waited to remove the freezer paper until after the glue dried. A new pattern needs to be cut when the wax wears off the freezer paper ... after about six shoes. That was when I decided to flip the drawing to reverse the direction of the shoe.
 I drew a box on freezer paper that a pair of shoes in the size I made would fit inside. It was cut apart on the lines and constructed in the same technique that was used to make the shoes.
 The key board is contructed with silk satin fabric. The ribbon is a dimensional bow. Musical note sequins decorate the box lid.
 I love black and white graphics with red thrown in.
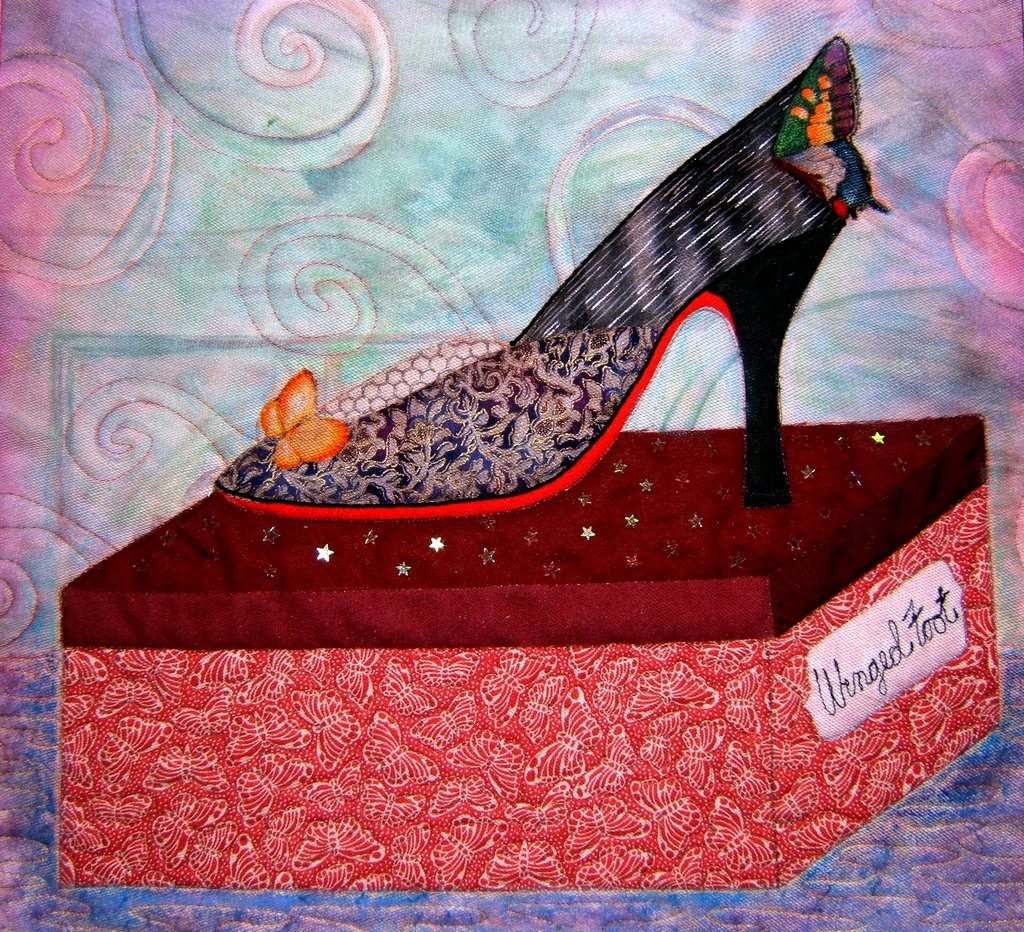 The three printed fabrics are metalic. To carry through the glitz, I added glitter glue colors to the butterflies. Star sequins decorate the box lid.
 The Bear Facts
 The flowers are cut from a trim and then clustered under tulle. A metallic cord is couched along the sole. The front edge of the box's top is shaded with an orange oil stick pastel.
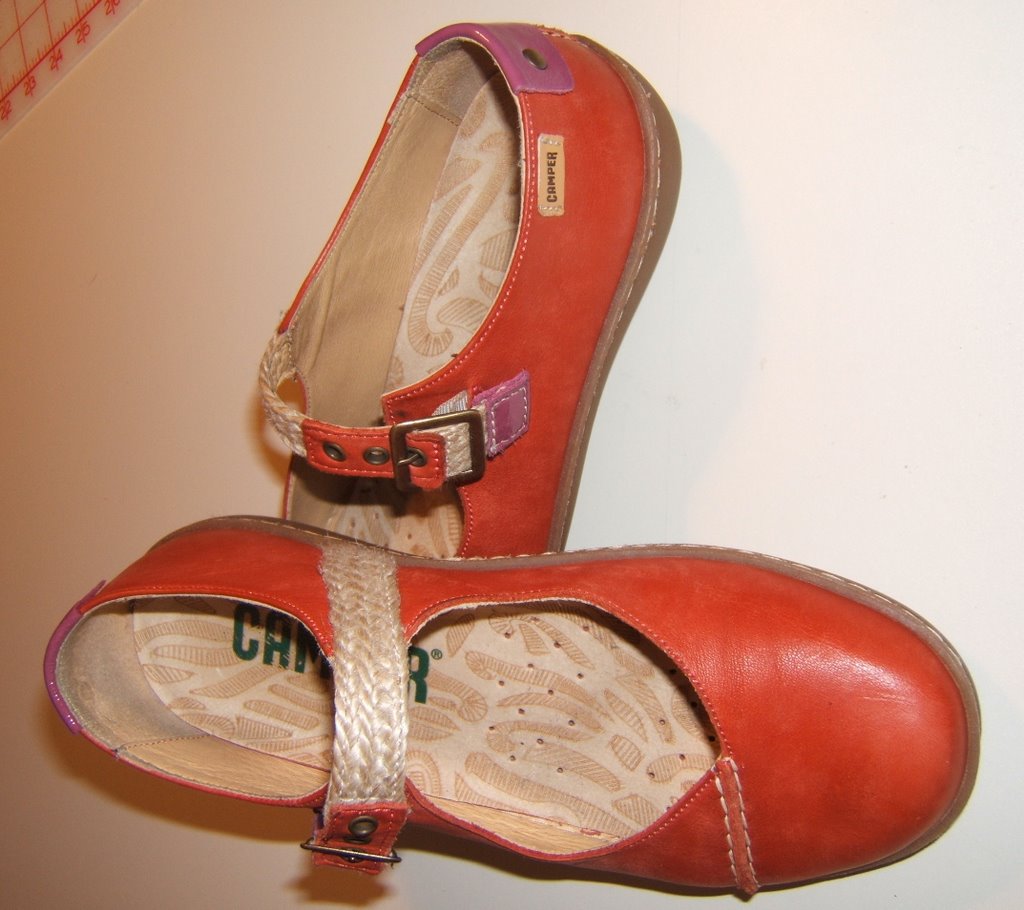 I did wear a pair of fun new beaded wedge shoes to lunch and a gallery last spring and my back was out for a week. Aargh! They really were comfortable all the while, but by bedtime I could hardly walk.
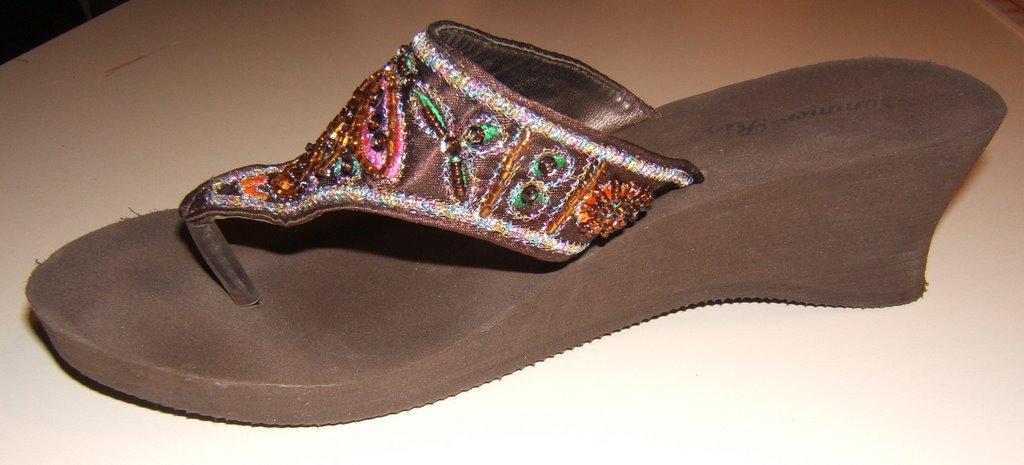 So, I got these for summer fun.
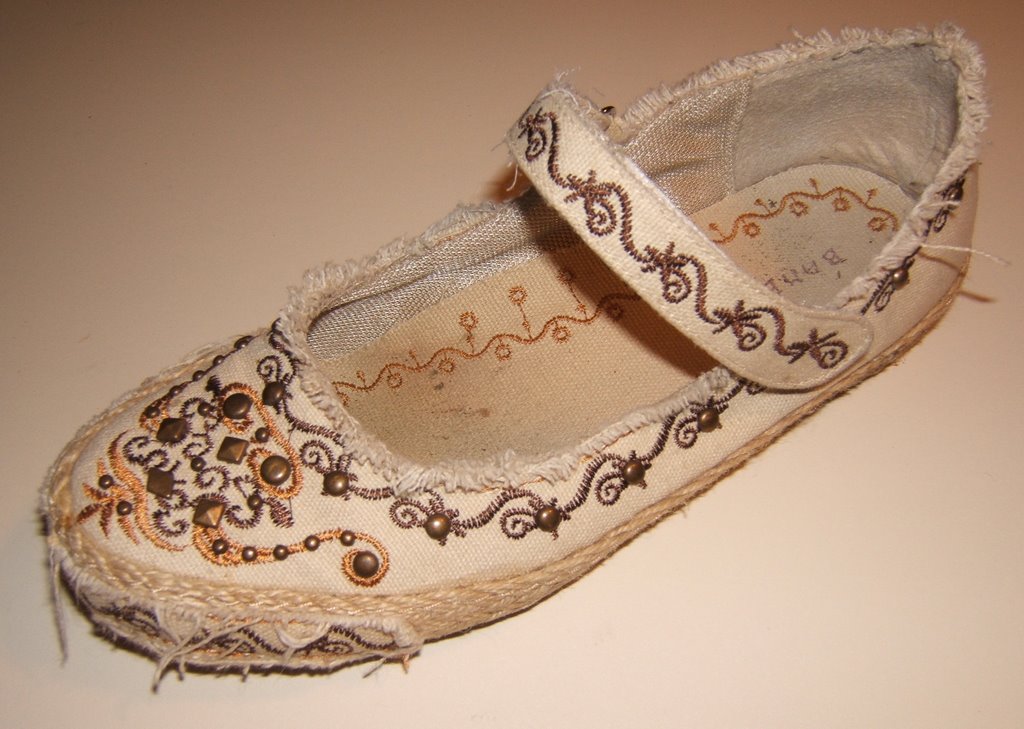 I also have "art" shoes. These were purchased this way. I have to tie the long laces around my ankle to keep them on.
 These were a favorite pair of white leather shoes that became grungy, so I painted them with fabric paints and inks. There's a coating of mink wax on top. This was done several years ago and the paint has never cracked. It hasn't worn off the rubber sole either.
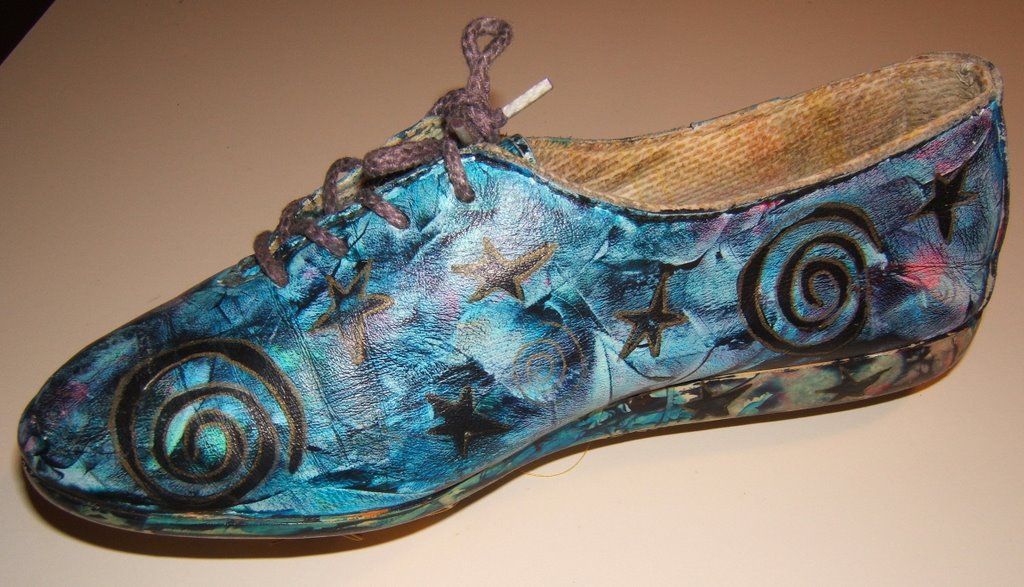 Guess I'll have to dream on with Imelda and just continue going bare/sock footed and don only flat shoes. These are what I wear most often in the winter weather.
 NO, I didn't piece all those little squares in the shoe. That part is whole cloth.
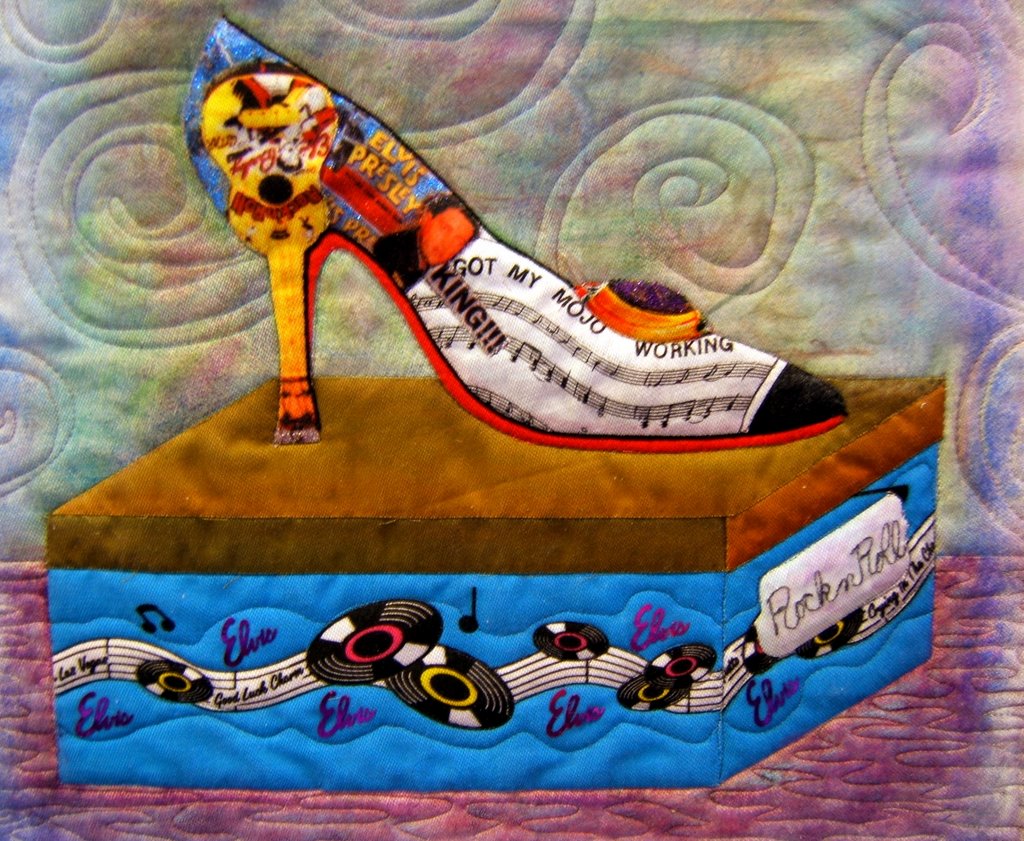 I live with the "World's Greatest Elvis Fan". So of course I had to make a rock'n roll shoe featuring the King.
 My husband tried to talk me out of the one I made for "Imelda's Dream" quilt. He was disappointed that I wouldn't let him have it until he opened his birthday present of this large one made especially for him.
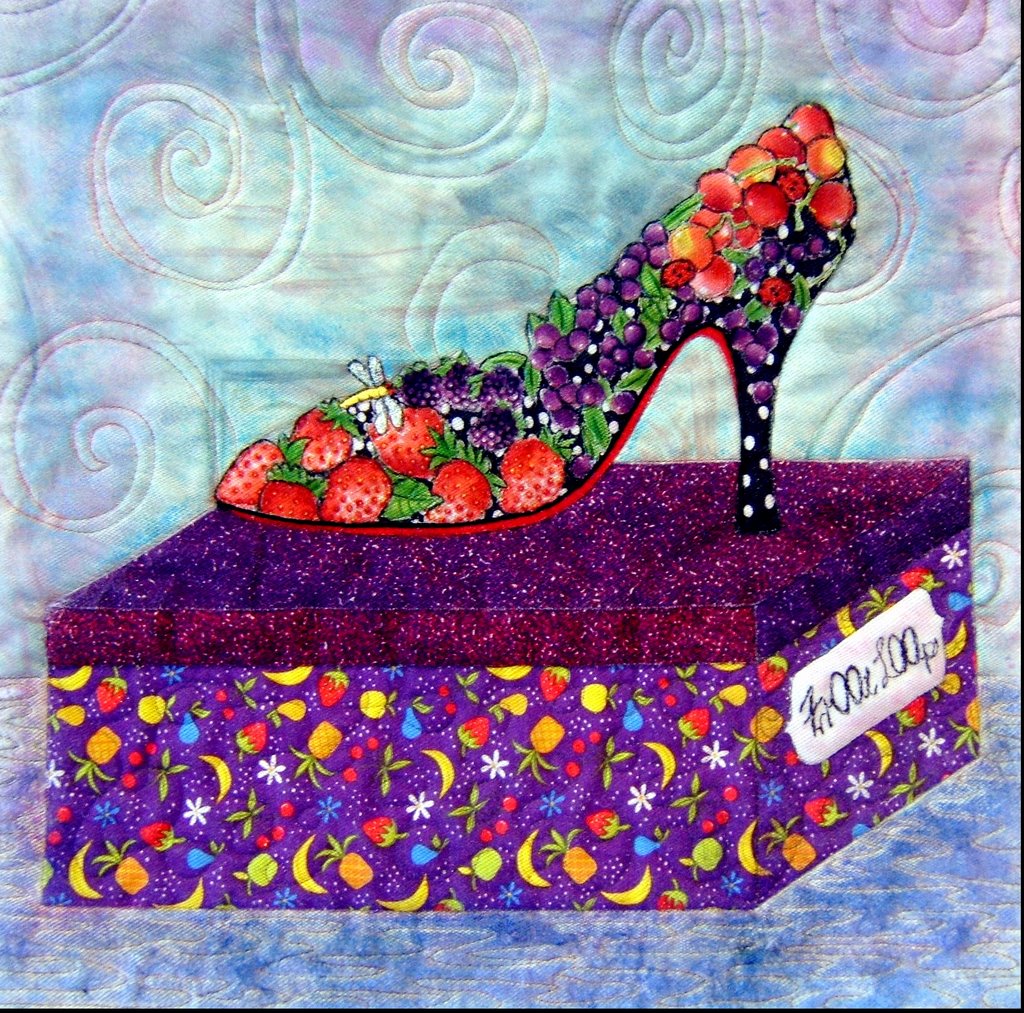 The berries were all cut from a quarter yard of a fruit printed fabric. There were a lot of berries. Enough to make three shoe quilts. One for "Imelda's Dream", one for Alicia's and my friend, and this one that I donated for our guild to sell at the annual quilt show.
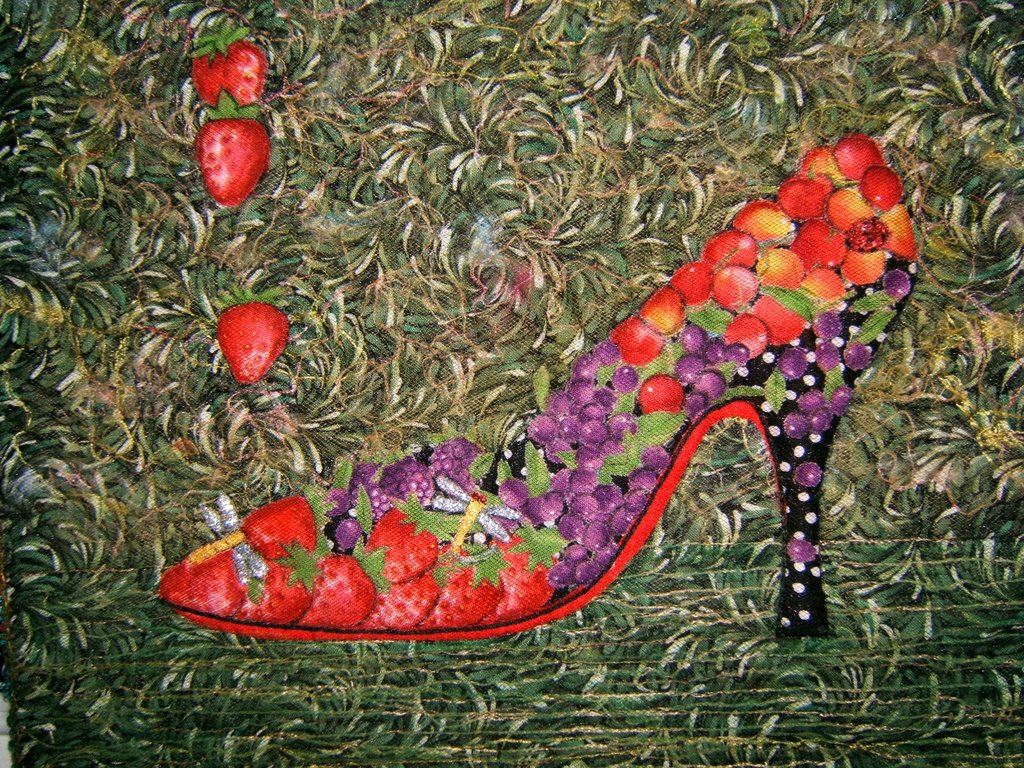 "Fuit Footwear"
 I couldn't resist playing with the vegetables on a large scale printed fabric for this one. Each of them just fell into place on this shoe. This heel is really spiked. I just couldn't trim away that asparagus tip.
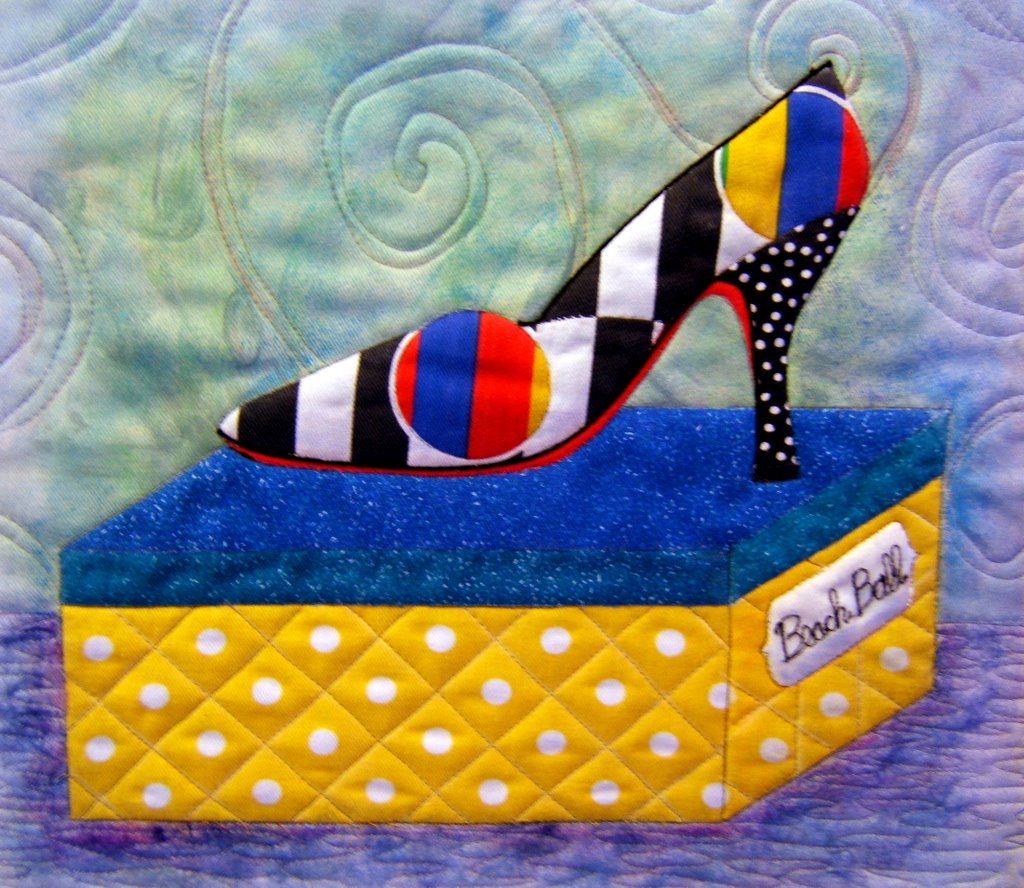
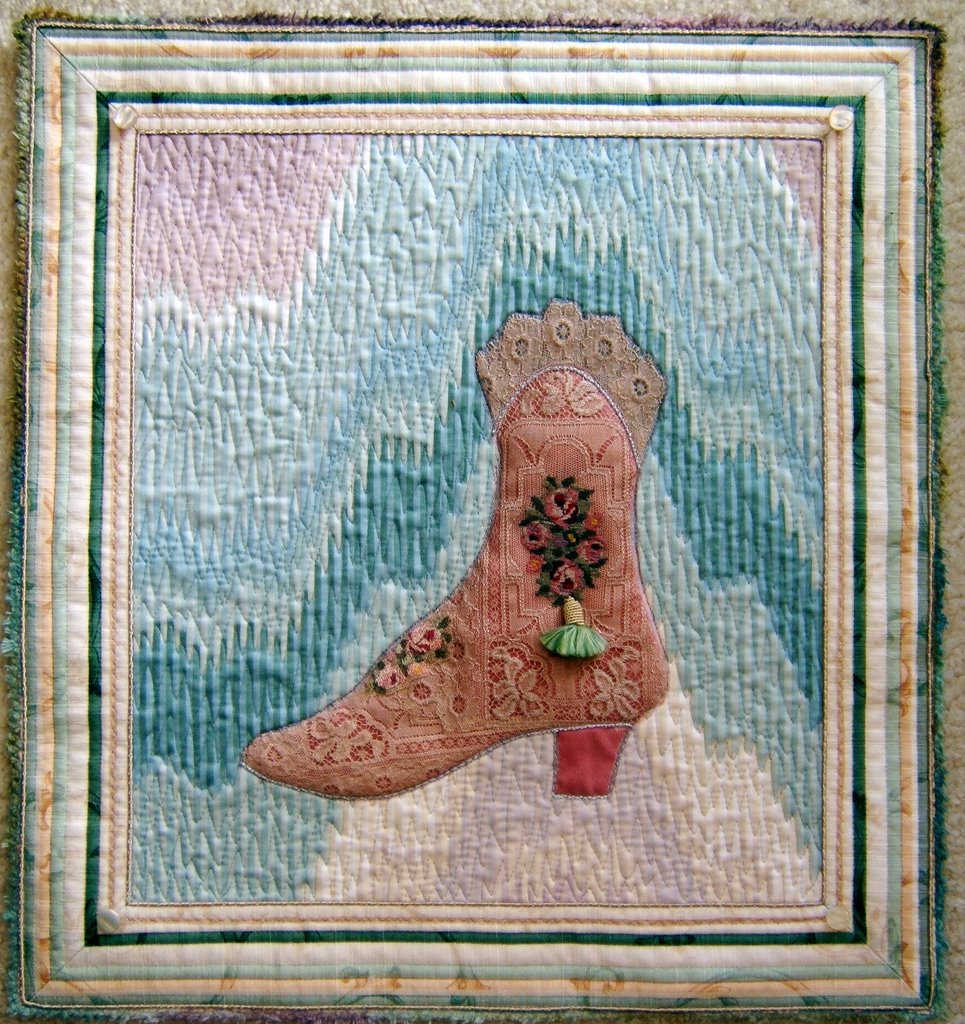 This quilt was a birthday present for my sister in Indiana. It hangs in the room that also has her collection of dolls. The boot is made from a lace dresser scarf and has a silk taffeta under layer and heel. The background and frame are home dec fabrics given to me by my interior decorator friend, Ebbie.
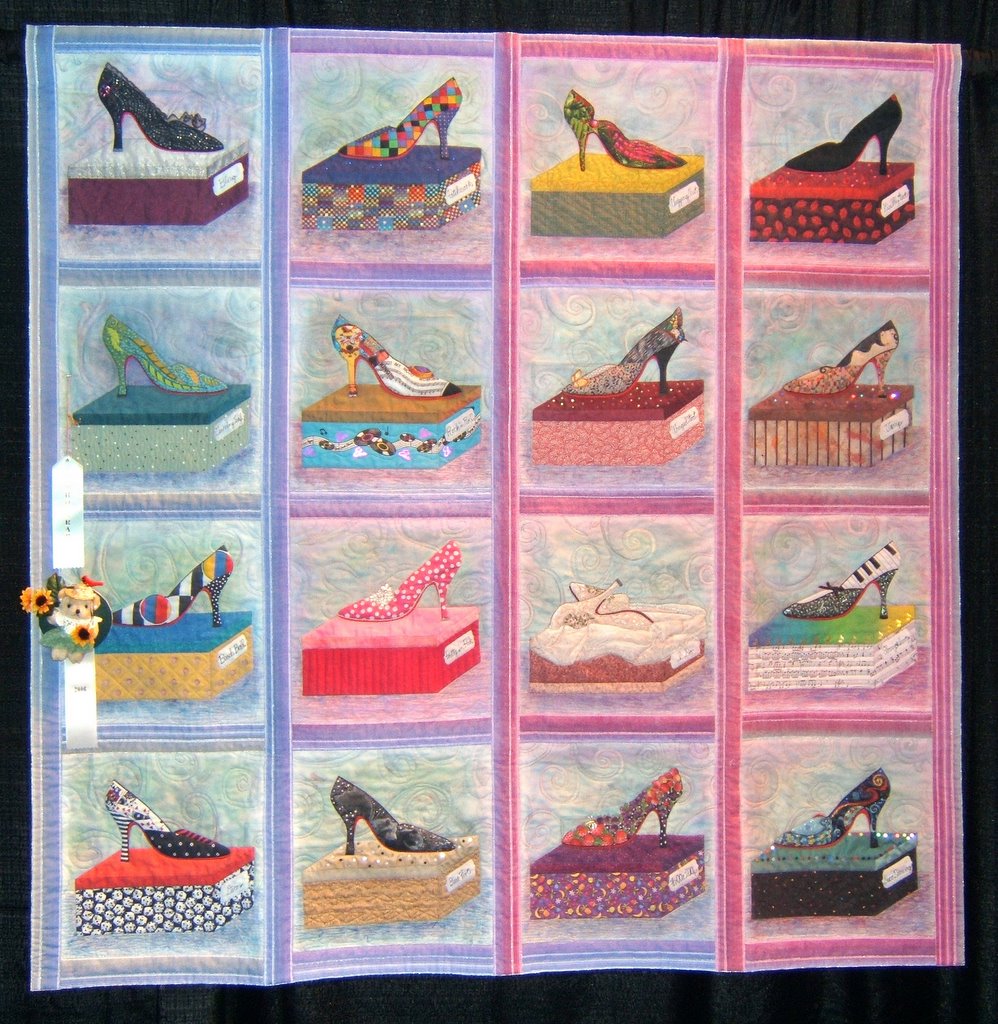 Each shoe in its "lit" display cube is a translation of a heel designed by Christian Louboutin, a Parisian shoe designer. He paints all the soles of his shoes red. The glow of the lights is achieved with oil pastels. I had great fun designing and constructing the shoes two years ago. Last spring they got names and boxes. Giving them all a venue took just about every moment of studio time since I got back from Michigan. It's contructed with my collage technique of layering all the elements under tulle netting. The machine quilting holds everything in place. This may just be my last large machine quilted piece. It was a real struggle wrestling this much quilt through the sewing machine.
 I'm very pleased that "Imelda's Dream" also received the "Just For Fun" special award.
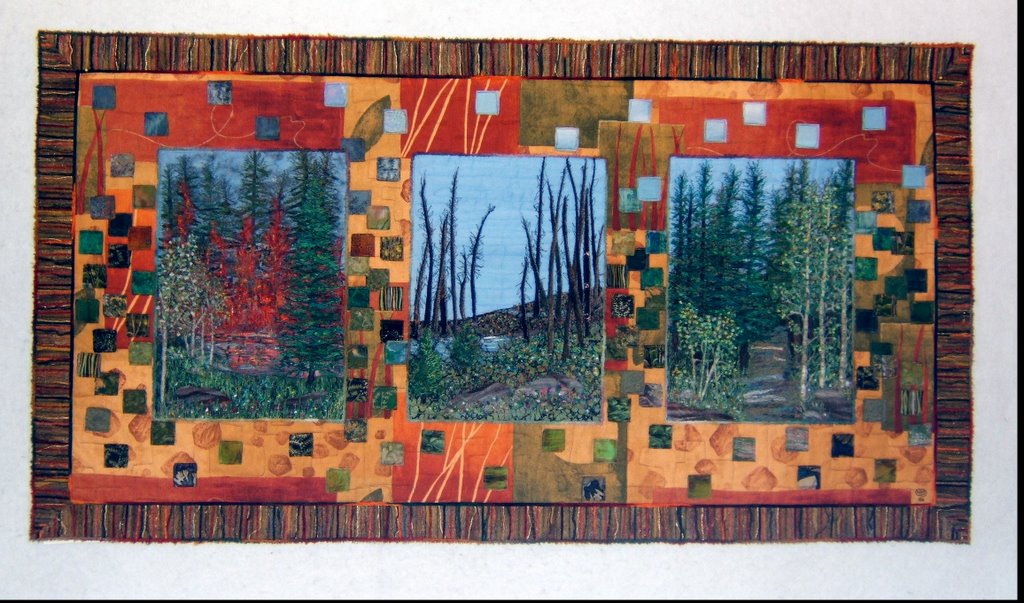 I was inspired to make this tryptic when Lee and I hiked through an area that had burned ten years earlier in Jackson Hole, Wyoming. I had a strong emotional reaction to the tender new growth under the still standing burned trees. It was a glorious early summer day under a clear blue sky. There were flowers blooming everywhere among the new growth trees. I couldn't help but think of how perceived destruction is often necessary for regeneration. A prominent example being chemotherapy.
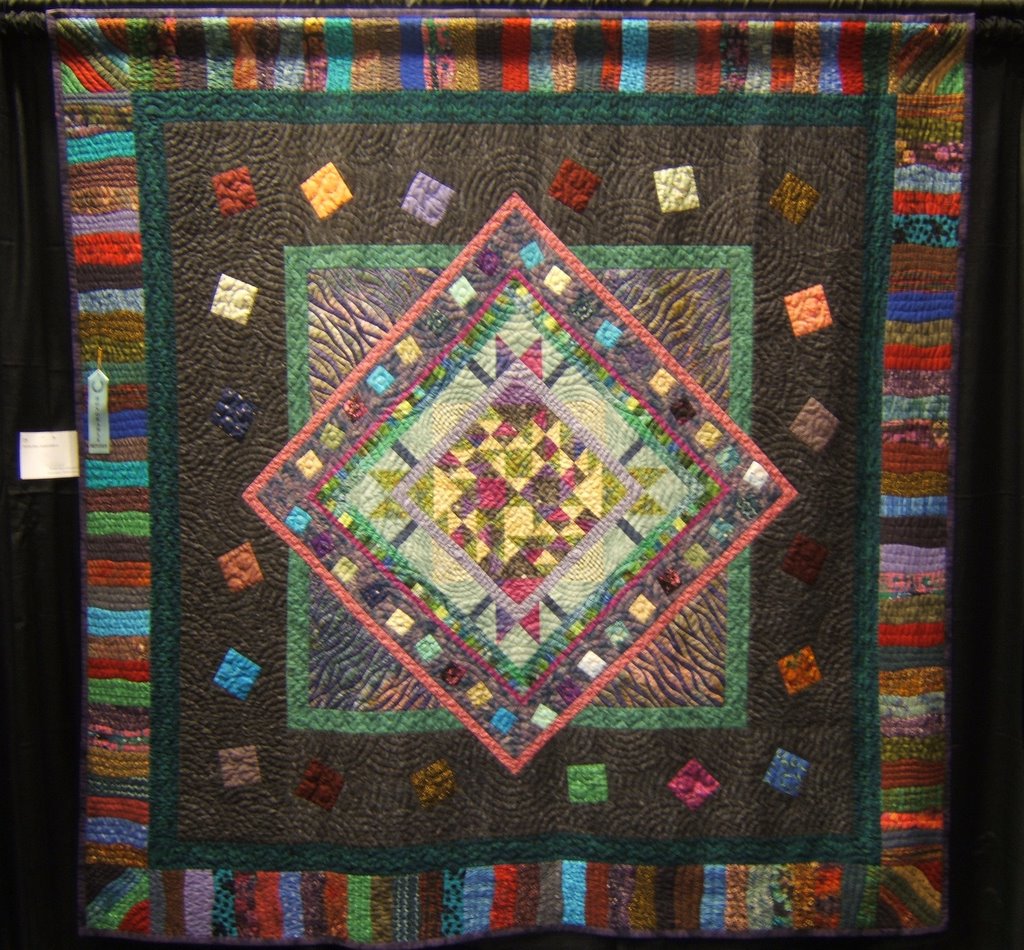 All kinds of squares joyously dance through this quilt. The design evolved through a "round robin" design exercise with my daughter-in-law, Jeanette Jancius Durand, and niece-in-law, Diane Cross Durand. We had each designed and made the center panel for a quilt. Then we swapped those and added to it. The challenge was to make the addition unique and to have it work with what was already there. At the end we each had a large piece that the three of us had contributed to. I continued adding onto mine to make this bedsized quilt.